# Kitsu Publisher
Kitsu is a web application to share the progress of your productions and validate your deliveries. It improves the communication between all stakeholders. Which leads to better pictures, shipped faster.
The Kitsu Publisher is a desktop application that connects DCC Tools to Kitsu. Through it, your artists can see their todo list, comment tasks and send previews to Kitsu directly from their tools.
# DCC Integrations Status:
- Blender
- Toon Boom Harmony
- Unreal Engine
Work in progress:
- Photoshop
- Nuke
# Installation
# Installation of the Kitsu Publisher
# Pre-Requisites
You need to download (or to build if you want to: see Development Environment) your preferred installer/package/portable for the app corresponding to your OS in the releases (opens new window).
All commands have the keyword {version} in the filenames, you need to replace the version with the current version of the Kitsu Publisher.
# On Linux
deb package (for debian based distributions):
To install the package:
dpkg -i kitsu-publisher_{version}_amd64.debThe package is now in your applications and in your $PATH.
rpm package (for RHEL based distributions):
To install the package:
rpm -i kitsu-publisher_{version}_x86_64.rpmThe package is now in your applications and in your $PATH.
snap package:
To install the package:
snap install kitsu-publisher_{version}_amd64.snap --dangerousThe package is now in your applications and in your $PATH.
tar.gz archive:
To extract the archive:
tar -xf kitsu-publisher-{version}.tar.gzTo run the app:
kitsu-publisher-{version}/kitsu-publisher
AppImage:
to run the app:
./Kitsu publisher-{version}.AppImage
# On Windows
NSIS Installer:
Double-click on the installer (Kitsu-publisher-Setup-{version}.exe) and follow the instructions.
The package is now in your applications.
Msi installer:
Double-click on the installer (Kitsu-publisher-{version}-ia32.msi) and it will install directly the app.
The package is now in your applications.
Portable application:
- Double-click on the executable (Kitsu-publisher-{version}.exe) to run the app.
Zip portable application:
Extract the zip (Kitsu-publisher-{version}-ia32-win.zip) by right-clicking and select "Extract All" and then follow the instructions.
Double click on the executable (Kitsu publisher.exe) inside the extracted folder to run the app.
# On MacOS
DMG installer:
Double-click on the installer (Kitsu-publisher-{version}.dmg), a window should open.
Drag and drop the Kitsu logo on the "Applications" folder and it will install directly the app.
PKG installer:
To install the package (you can also install the package by double-clicking on it and following the instructions):
sudo installer -package Kitsu-publisher-{version}.pkg -target /
Zip portable application:
Double-click on the zip (Kitsu-publisher-{version}-mac.zip) to expand the zip.
Double-click on the Kitsu publisher icon it will launch the app.
# Development Environment
# Pre-Requisites
To develop or to build the Electron app you need Node.js (opens new window)>=16.11 installed.
# Dependencies
To install all the dependencies needed by the Electron app you have to run in the project folder:
npm install
# Run
To run the Electron app in development mode you have to run an npm script:
npm run dev
It will spawn an electron instance and a Vite development server.
# Build the Electron App
# Pre-Requisites
On debian based Linux you need:
To install these packages:
apt-get install build-essential libcairo2-dev libpango1.0-dev \
libjpeg-dev libgif-dev librsvg2-dev
If you want to build specific target like rpm you need to install:
apt-get install rpm
On Windows you need:
- See the wiki (opens new window) of node-canvas.
On macOS you need (with Homebrew (opens new window)):
brew install pkg-config cairo pango libpng jpeg giflib librsvg
# Building the App
You need to run npm scripts:
If you only want to build an unpackaged directory:
npm run buildIf you want to build for all targets:
npm run build:all
# Installation of the DCCs connectors
# Pre-requisites
You need to download the connectors-{version}.zip archive in the releases (opens new window). After that, you have to unzip the archive (with right-click "Extract All" on Windows or unzip on Linux/macOS for example).
# Blender (version>2.80)
You need to go inside the connectors/blender directory.
On Windows (with PowerShell):
If you want to be guided through the installation of the plugin, you have to right-click on the script install.ps1 and select "Run with PowerShell" to run the script in prompt mode. If you have multiple installations from installer of Blender it will install the plugin for all the installations (not if you select a portable Blender).
If you want to run the script with PowerShell command line it's possible, look at the help with:
.\install.ps1 -help
On Linux:
If Blender is installed with a system package (for example: deb or rpm):
bash ./install.sh --systemIf Blender is an unpacked directory (tar.xz archive):
bash ./install.sh --unpacked-directory=PATH_TO_YOUR_PORTABLE_BLENDERIf Blender is installed with a snap package:
bash ./install.sh --snap
On macOS:
If Blender is installed with a dmg image or Homebrew:
bash ./install.sh --dmg
# Toon Boom Harmony
You need to go inside the connectors/harmony directory.
On Windows (with PowerShell):
If you want to be guided through the installation of the plugin, you have to right-click on the script install.ps1 and select "Run with PowerShell" to run the script in prompt mode. If you have multiple installations from installer of Toon Boom Harmony it will install the plugin for all the installations.
If you want to run the script with PowerShell command line it's possible, look at the help with:
.\install.ps1 -help
On macOS:
- coming soon
# Unreal Editor (version>=5)
You need to go inside the connectors/unreal directory.
On Windows (with PowerShell):
If you want to be guided through the installation of the plugin, you have to right-click on the script install.ps1 and select "Run with PowerShell" to run the script in prompt mode. If you have multiple installations from installer of Unreal Editor it will install the plugin for all the installations.
If you want to run the script with PowerShell command line it's possible, look at the help with:
.\install.ps1 -help
On Linux:
- coming soon
On macOS:
- coming soon
# Publishing a Preview with the Kitsu Publisher
You must first have the Kitsu publisher and the plugin installed on your computer.
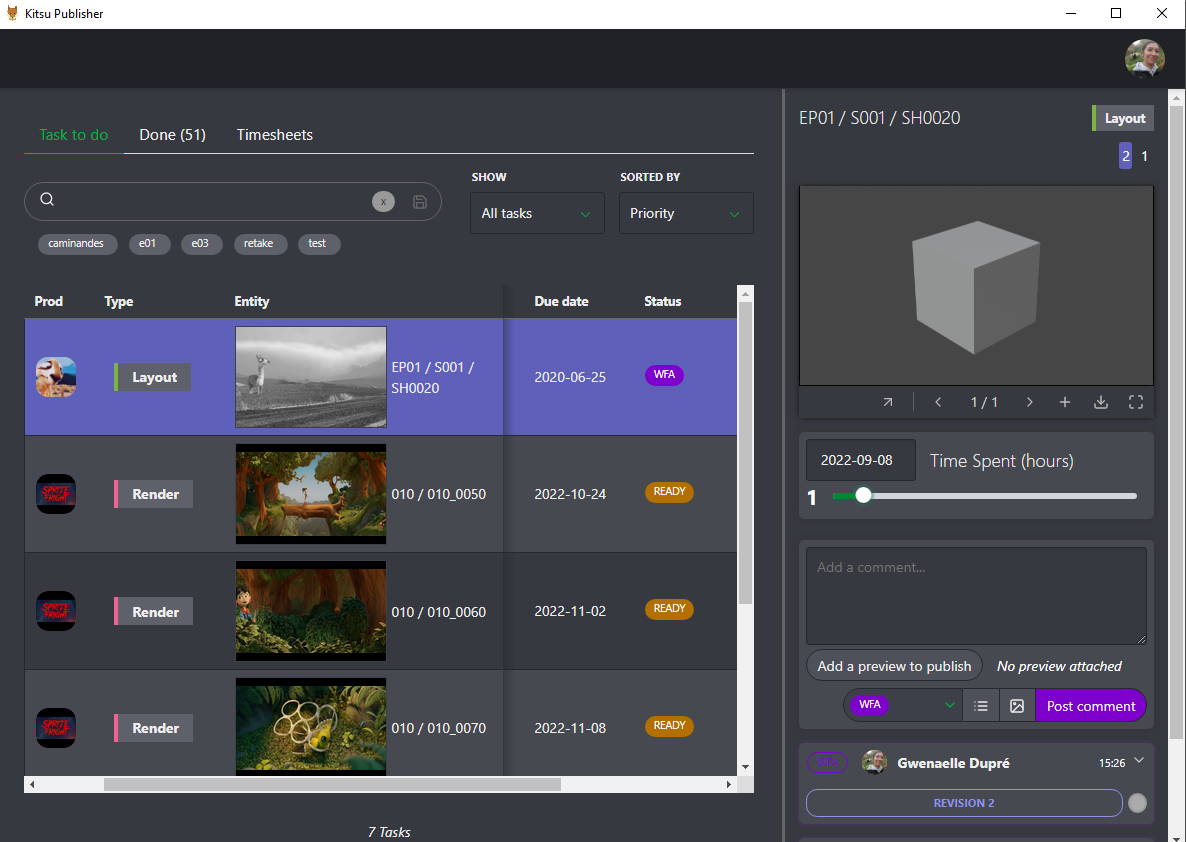
# Consult your To-Do List
First, you must log into the publisher using your kitsu address, login, and password, as you would with your usual Kitsu.
You directly arrive on your to-do list and have access to the same option as on Kitsu.
You can see your to-do list, the done list, and timesheets.
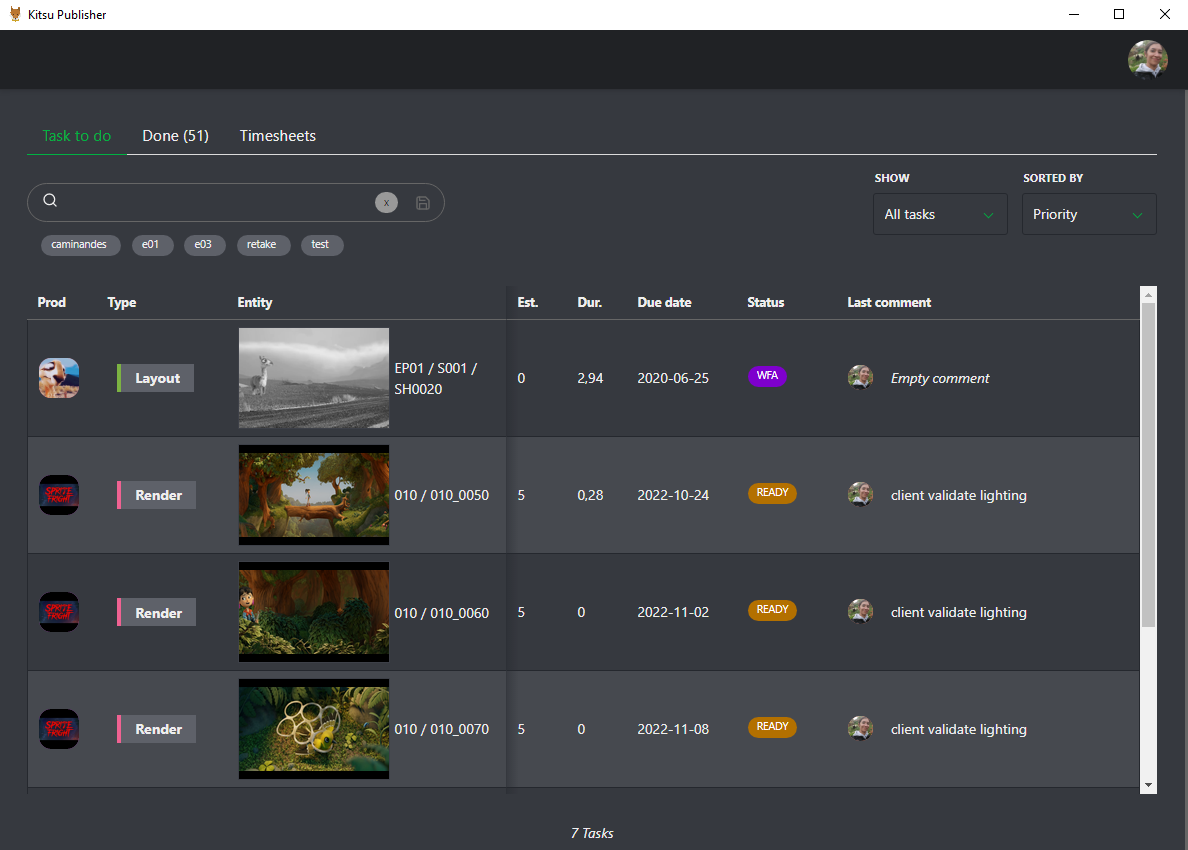
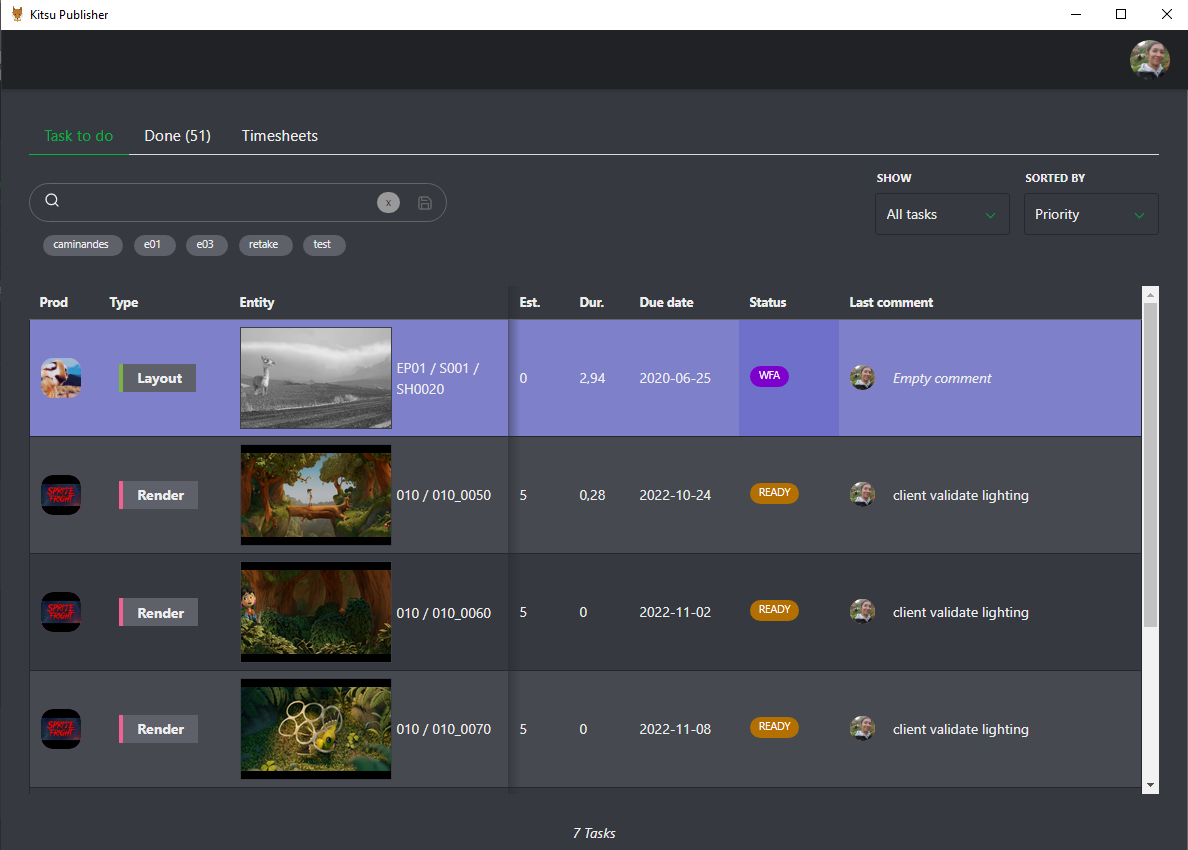
If you want to comment or publish on a task, simply click on the status.
The comment panel will open with the previews and the whole history of this task.
The first new element is that you have direct access to your timesheet. You can move the cursor to adapt the timeline to the number of hours spent on this specific task.
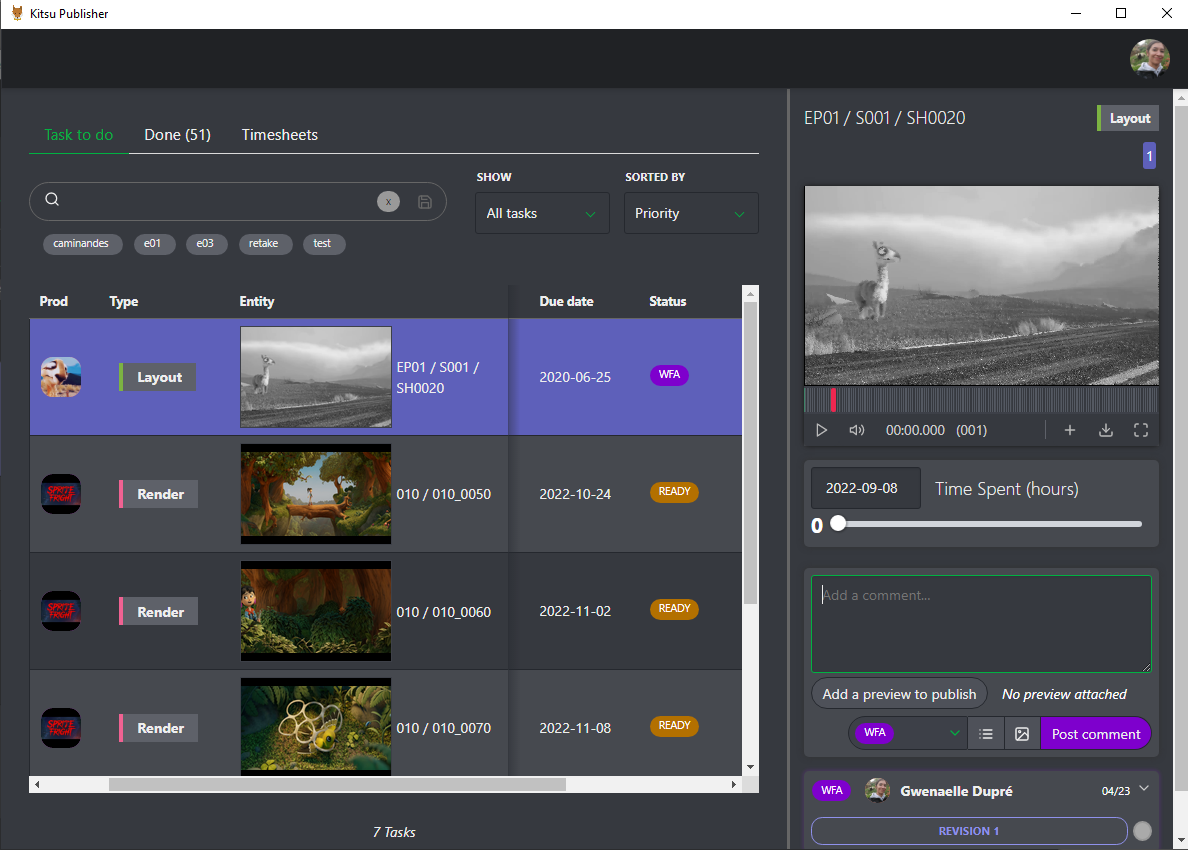
When you are ready to publish your work, click on the Add a review to publish button.
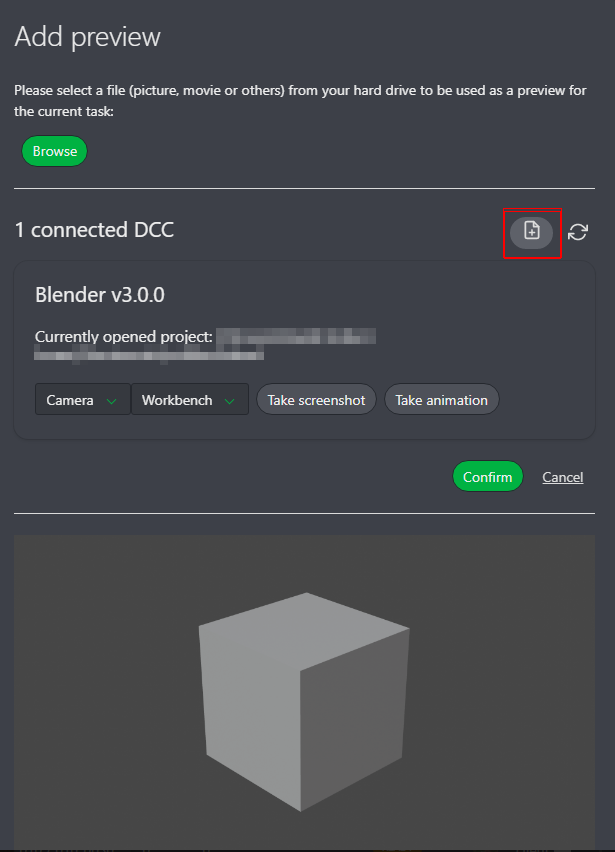
# Publish a Preview from the Publisher
You now have the choice between the traditional way of publishing by uploading the preview by yourself. Or you can let Kitsu Publisher do it for you.
Kitsu Publisher will recognize your opened DCC and the project opened.
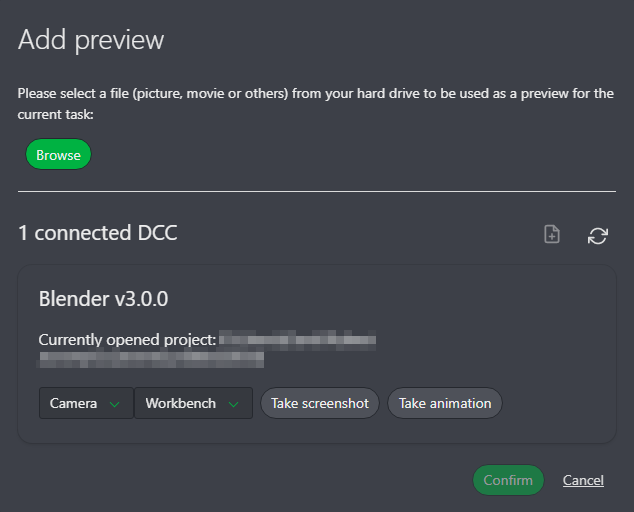
You can select your Camera and your render engine of choice. Then select if you want to take a screenshot or render the whole animation.
Here, for example, we select the Screenshot option. Kitsu publisher will ask your DCC to do the render for you and display the result.
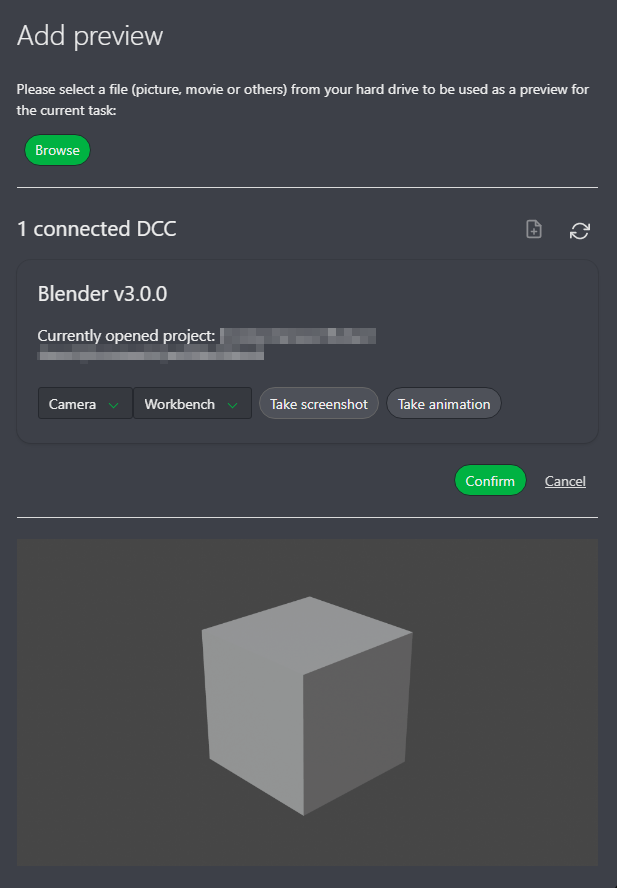
Once satisfied with the result, you can click on Confirm. It will close the pop-up window, and you will be back in the comment panel. You can now type your comment, change the status and click on Post Comment to upload the preview into Kitsu and share it with your team.
Now everybody logged in to Kitsu will see your comment and publish.
# Setup the Publisher
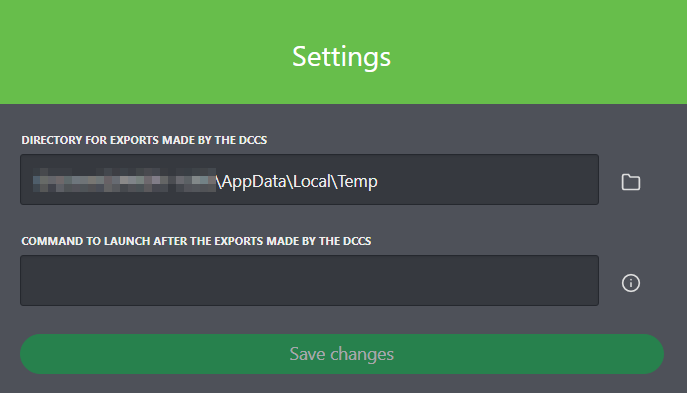
# Change the Save Directory and Add Scripts
You can go to the setting menu when you click on your avatar.
You have two options here: the first one is the directory for exports made by the DCCs.
Per default, it's set to your temporary directory. You can change it, and then this specific folder will be used for all the exports. You can also use a network drive.
The second option is about the command you can launch after the exports made by the DCCs but before the upload into Kitsu.
You can launch a command or a script directly on the exported file, the folder, etc.
You can insert variables in your command. You just have to put the chosen variable under curly brackets (for example: {exportFile}). These variables are also in the environment variables at runtime. They are listed below:
- exportsDirectory (String) : the directory path where the exports are made.
- exportFile (String): the path of the file that will be exported.
- exportIsAnimation (Boolean) : true if the export is an animation else false.
- exportIsScreenshot (Boolean) : true if the export is a screenshot else false.
- DCCName (String) : the name of the DCC.
- DCCVersion (String) : the version of the DCC.
- currentProject (String) : the path of the current project opened in the DCC.
- cameraSelected (String) : the name of the Camera selected.
- rendererSelected (String) : the name of the renderer selected.
- extensionSelected (String) : the name of the extension selected.
- entityName (String) : the name of the entity.
- entityTypeName (String) : the name of the entity type.
- episodeName (String) : the name of the episode type.
- fullEntityName (String) : the full name of the entity.
- projectName (String) : the name of the project.
- taskStatusName (String) : the name of the task status.
- taskTypeName (String) : the name of the task type
# View the Result of the Setting on the Export Pop-Up
Once your preview is rendered, you can check the directory and the scripts launched.
If you click on the option icon you will see the command launched before the import.
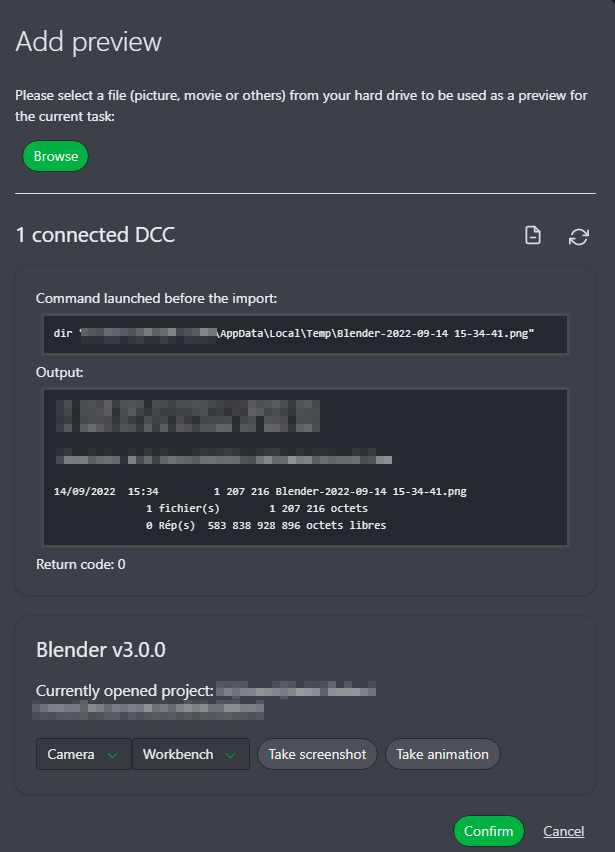
If everything is fine, click on Confirm to close the pop-up.
And then post your comment as usual.
← Bots Chat Integration →